Hetzner Cloud is one of the cheapest yet most reliable cloud VPS providers on the market, and the #1 choice among Appliku users for deploying Django applications. In this guide you'll learn exactly how to deploy Django on Hetzner Cloud using Appliku, from server creation to a live HTTPS deployment, in under 15 minutes.
If you are looking for tutorial for another cloud provider checkout out one of these:
- Deploy Django to Digital Ocean Droplet
- Deploy Django to AWS EC2
- Deploy Django to AWS Lightsail
- Deploy Django on Linode
- Deploy Django on Azure
- Deploy Django to Google Cloud Platform
Table of contents
- Table of contents
- Why Deploy Django on Hetzner Cloud?
- Requirements
- Django Application
- Appliku Account
- Hetzner Account
- Adding an application
- Define processes
- Environment variables
- Reviewing application logs
- Open your application
- Setting Up a Custom Domain
- Monitoring Your Django App on Hetzner
- What’s next?
Why Deploy Django on Hetzner Cloud?
Hetzner Cloud gives you more computing power per euro than almost any other cloud provider. Here's a quick cost comparison for a typical Django app server:
| Provider | vCPU | RAM | Storage | Price/month |
|---|---|---|---|---|
| Hetzner CX23 | 2 | 4 GB | 40 GB | €5.49 |
| DigitalOcean Basic | 2 | 2 GB | 60 GB | ~$18 |
| AWS t3.small | 2 | 2 GB | N/A | ~$17 |
| Heroku Standard-1X | 1 | 512 MB | N/A | $25 |
A Hetzner CX23 at €5.49/month outperforms a $25 Heroku dyno. For a typical small-to-medium Django SaaS, you can run your entire stack (web, Celery worker, Postgres, Redis) on a single Hetzner server for under €8/month.
Why Appliku + Hetzner is the right combo: - Hetzner gives you the cheapest reliable infrastructure - Appliku automates everything: server setup, Docker, nginx, SSL certificates, deployments from GitHub/GitLab, Postgres, cron jobs, zero-downtime deploys - You own the server. No vendor lock-in, your data stays with you - Scale by adding more Hetzner servers at any time
Requirements
- An application to deploy
- Appliku Account
- Hetzner Cloud Account
Django Application
The application used for this tutorial can be found here: https://github.com/appliku/djangotutorial
Your app should be pushed into a git repository. You can use GitHub, GitLab.
For ease of deployment we have the following recommendations:
- have the
requirements.txtfile in the root of your git repository. Don't forget to addgunicorn(or alternative) andpsycopg[binary]for Postgres support - Your app needs to respect environment variables like
DATABASE_URLfor the database credentials,ALLOWED_HOSTSfor the list of allowed domains,SECRET_KEYandREDIS_URLif applicable. - Please, don't forget to have DEBUG turned off when you deploy to a publicly accessible environment.
We have a full How to Start and Deploy a Django Project if you want to learn more
Also: check our SpeedPy.com SaaS boilerplate
Appliku Account
If you don't already have an Appliku Account create it by going here: https://app.appliku.com/
Click on "Add a server"

Pick a Custom Server:

Select this key, we will need it at server creation step.

Hetzner Account
If you don't already have an account head over to their site to sign up Hetzner Cloud. (this link gives you €20 in Hetzner cloud credits).
When you have the account, go to their cloud panel and create a project.
https://console.hetzner.cloud/projects

Click on the newly created project

Hetzner Server Parameters
Click on Add Server

Pick the region you prefer.
Then pick OS image: Ubuntu 24.04 (recommended for new deployments in 2025/2026)

Pick a server type.
Appliku supports both x86 and ARM servers. But your app's dependencies should be up to date in order to work on ARM server.
We recommend ARM (CAX series) for better performance and cost savings. ARM servers from Hetzner deliver better price-to-performance than x86 for most Django workloads. At the time of writing, Hetzner ARM servers are available in the Falkenstein data center.
While you can go with as small server as you want, we recommend to get at least 2 vCPUs and 4 GB RAM. The CX23 (2 vCPU, 4GB RAM) at €5.49/month is a great starting point for side projects and early-stage SaaS.
ARM servers start with 4GB RAM and 2 vCPUs
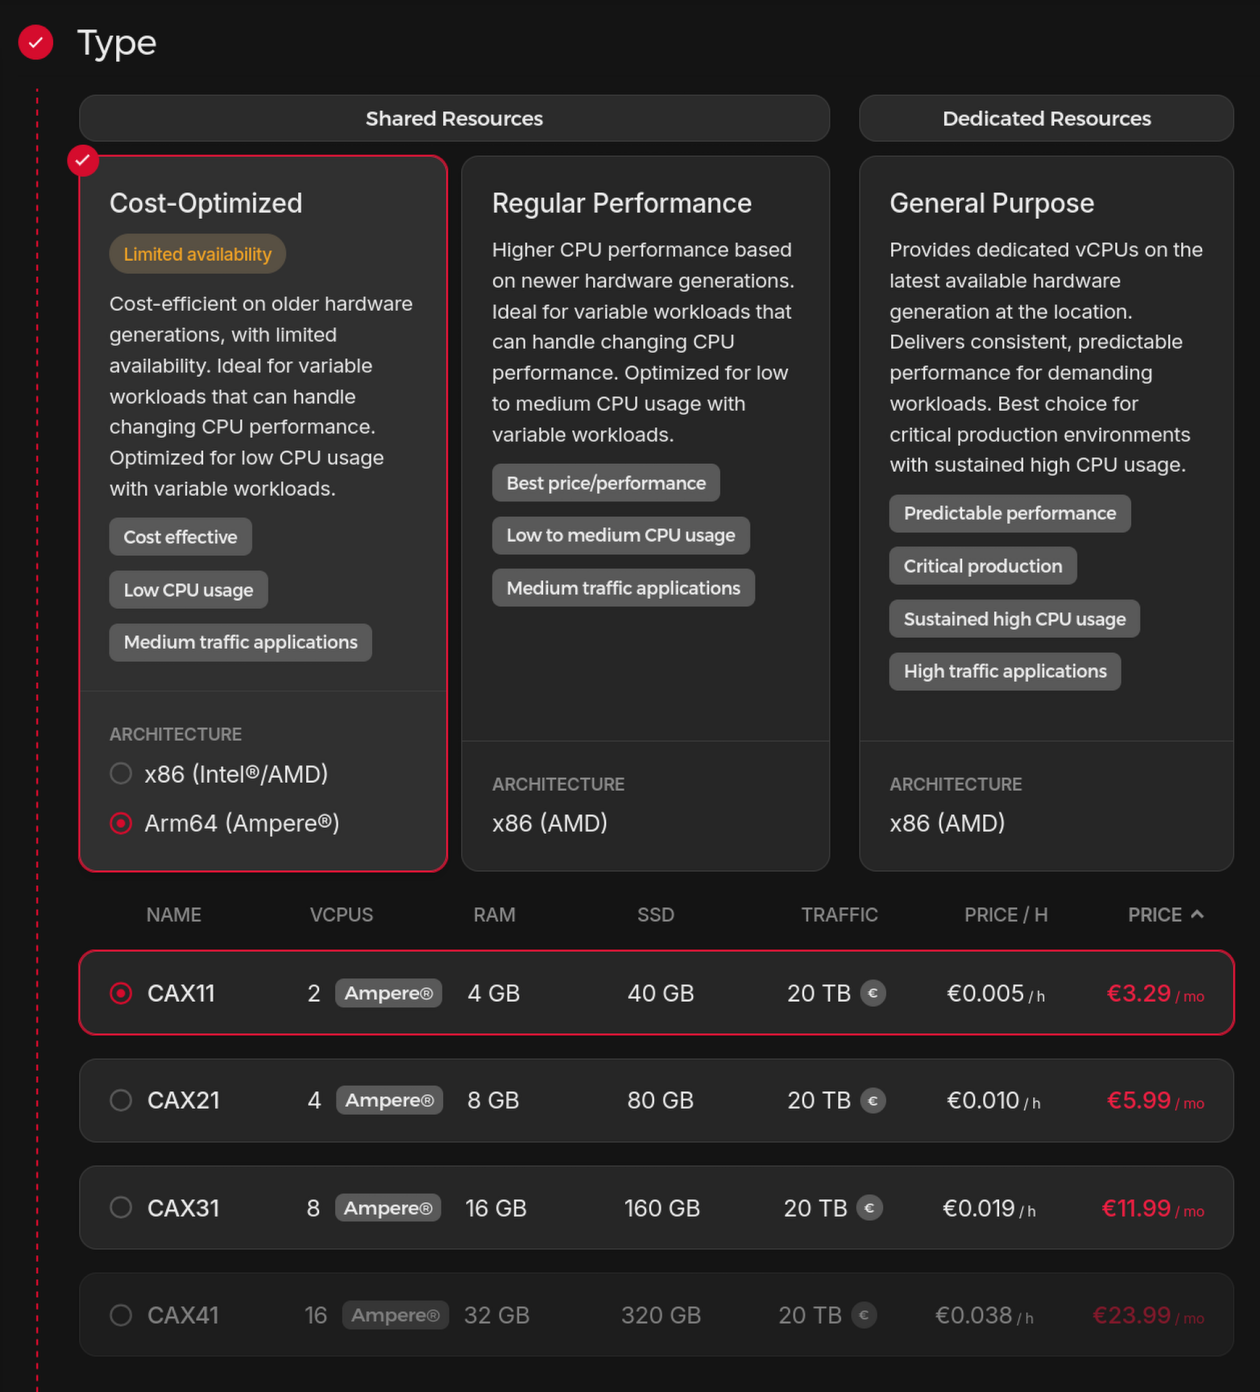
Networking: Appliku only supports servers with IPv4. You will not be able to add your server to Appliku with IPv6 only.

Scroll down to SSH Key section and click on "Add SSH Key"

Paste the SSH key provided by the Appliku Dashboard

Give a name to the key and select "Set as default key" (optionally), click Add SSH Key

Click "Create & Buy Now"

When the server is ready (green dot appears on the left) click on the server's IP address to copy it

Paste it into the IP field in Appliku Dashboard

And click Check credentials and add server
You will be brought to the server page. You will see that setup process is started. You can see Setup Logs for details of the process or errors if setup fails.
Appliku automatically installs Docker, nginx, and sets up everything needed to run your Django app. This takes about 3–5 minutes.

Server setup is complete:

Adding an application
Click on the "Applications" menu link

You will get to the Git Provider selection.

Creating application from GitHub
Select the "Setup Credentials" for GitHub.

You need to get a personal token from GitHub.
Go to this link to create a token: https://github.com/settings/tokens

Click on Generate new token -> Generate new token(Classic) Fill in the note, select expiration date, check the "repo" checkbox and "user:email"


And click "Generate token".
Copy the token from the next page.

Go back to Appliku dashboard and paste the GitHub Token, and click Test Credentials and Save

Status must change to "Active".
Click on the logo in top left corner to get back to your team and go to Applications again and create an app, select GitHub.

Fill the form with the app name, select the repository with your application, branch and select the server, click on "Create Application".

You will see your app has been created, but not yet deployed.

Creating application from GitLab
Alternatively if you use GitLab you should add credentials for GitLab and create an app from GitLab.
Go to Applications menu link, Click "Add Application" and Setup credentials for GitLab.

You need to create a Personal Access Token here: https://gitlab.com/-/profile/personal_access_tokens
Give the key a name, set or clear expiration date, select "api" checkbox and click "Create Personal Access token"

Copy the token and paste it in Appliku dashboard.
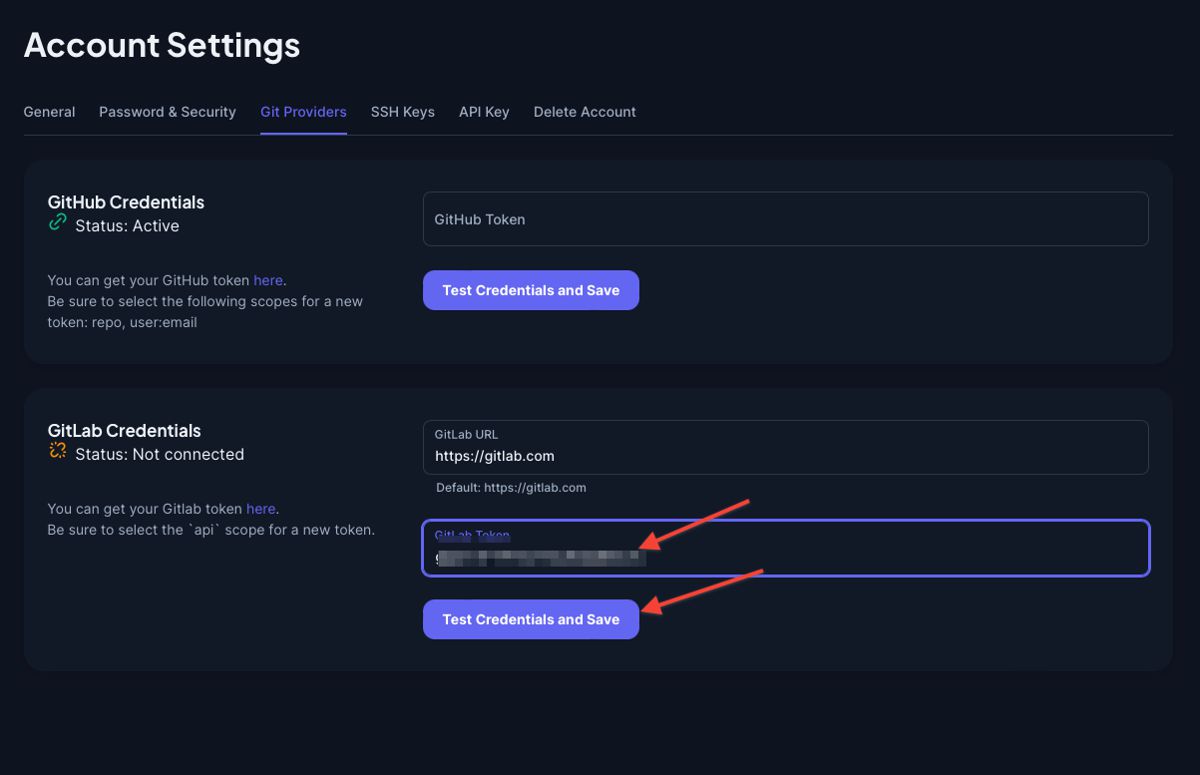
After you click "Test Credentials and Save" the Status should turn green and say "Active".
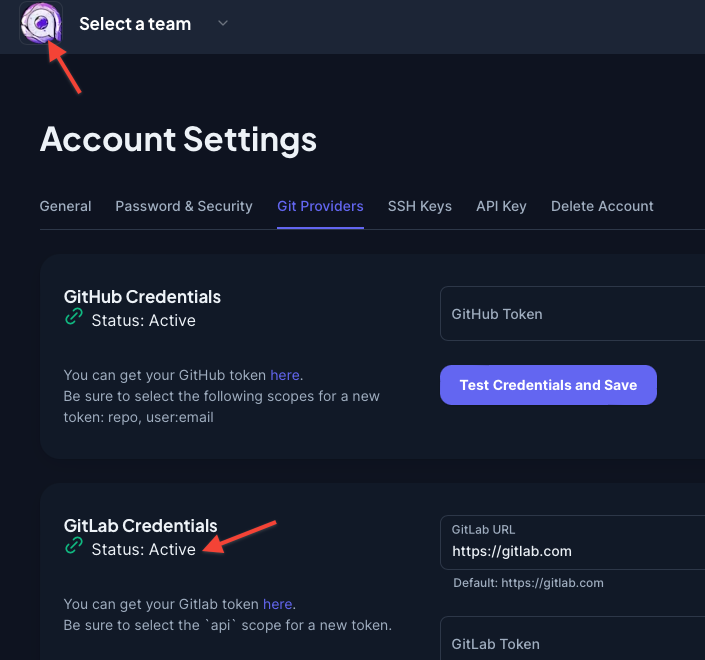
Click on the logo to go back to your team, go to Applications, Add Application and select GitLab

Give your application a name, pick repository and the branch, select the server and click "Create Application"

Setup the app
Databases
First, create a Postgres Database. Click on Add Database on the right

Select the Postgres 17 option and click "Create database"

Your database will start deploying, wait for the deployment status to become "deployed".

Define processes
Let's tell Appliku how to run your app
On the Application Overview page you will see a red triangle saying "No processes found".
Click on the "Add Processes" button.

Add two processes:
- one MUST be called web to answer to HTTP requests and command should be gunicorn project.wsgi --log-file -(pay attention to the last dash). It can be slightly different for your project
- second one MUST be called release and this is the command that will be executed after each successful deployment. If not specified it will default to python manage.py migrate. I recommend to create a bash script if your app needs to run several commands executed on each release. In our example, the command is bash release.sh

Click save and deploy button, a deployment will start.
Environment variables
Go to the "Environment Variables" tab and add env vars needed for your project.
At least specify the SECRET_KEY and ALLOWED_HOSTS.
These variables should be used by your app you can check here how to do that: https://github.com/appliku/djangotutorial/blob/master/project/settings.py
The SECRET_KEY variable value should be some long hard to guess string.

The ALLOWED_HOSTS variable should be a list of domains on which your app is accessible. As I already mentioned above, don't hardcode this, but make your app respect this environment variable.
By default, each app in Appliku receives a subdomain APPNAME.applikuapp.com, so in our example it should be mydjangoapp.applikuapp.com. If you add custom domains, make a comma-separated list like this mydjangoapp.applikuapp.com,example.com,www.example.com.
You can disable the default subdomain in build settings.
When you are finished with environment variables click the "Save and deploy" button and deployment will start.
Appliku automatically provisions a free Let's Encrypt TLS certificate for your domain. HTTPS works out of the box with no extra configuration.
Reviewing application logs
From the Application Overview page you can go to App Logs to check if there are any errors.


Open your application

To access your app click on "Open App" and click on the domain name. It will open your app in a new window.
Setting Up a Custom Domain
Your app is immediately accessible at APPNAME.applikuapp.com. To connect your own domain:
- Go to your application page → Settings → Custom Domains
- Add your domain (e.g.
myapp.comandwww.myapp.com) - Copy the server IP from the Appliku server page
- In your DNS provider, create an A record pointing your domain to the server IP
- Save. Appliku automatically provisions a Let's Encrypt TLS certificate within minutes
No nginx configuration required. HTTPS is automatic.
Update your ALLOWED_HOSTS environment variable to include the new domain:
ALLOWED_HOSTS=myapp.applikuapp.com,myapp.com,www.myapp.com
Click Save and deploy to apply the change.
Monitoring Your Django App on Hetzner
Application Logs
From the Application Overview, click App Logs to see real-time output from your gunicorn process. This is the first place to check after a deployment fails or when users report errors.
Server Health
The Appliku Server page shows CPU usage, memory, disk space, and the status of all running processes. For a CX23 at €5.49/month, you typically have plenty of headroom for a small-to-medium Django app.
Background Task Monitoring with Celery Flower
If you use Celery for background tasks, add Celery Flower as a separate process in Appliku for a real-time task dashboard:
- Add a new process named
flower - Set the command to:
celery -A yourproject flower --port=5555 - Appliku will run it alongside your web process
Flower shows you worker status, task history, queue depths, and failures, all from a browser UI.
Deployment History
Every deployment is logged in Appliku. Click any deployment entry to see the full build output and error messages. This makes debugging failed releases straightforward.
What’s next?
Your Django app is now live on Hetzner Cloud with:
- Automatic deployments on every
git push - Free HTTPS / TLS via Let’s Encrypt
- Postgres 17 database running on the same server
- Custom domain with automatic SSL
- Zero-downtime deploys via Appliku’s rolling process
Running multiple apps? All apps on the same Hetzner server share the server cost. A single CAX21 (€7.49/month) can easily run 3–5 small Django apps. Compare that to $25+ per app on Heroku, and see how Appliku stacks up against every deployment platform or specifically as a Heroku alternative.
For a complete Django deployment reference, see the Deploy Django guide in our documentation.
For what hosting costs across providers and plans, see Django hosting: what it costs.