Ubuntu 18.04 LTS is going away. If you run a server with this version of Ubuntu then this guide will help you upgrade to 20.04 LTS.
Upgrade Guide Ubuntu 18.04 LTS to 20.04 LTS
Requirements: Ubuntu 18.04 LTS with running Django, Postgres and Redis in Docker
Create 18.04 LTS Droplet
For the purpose of this tutorial I have created a Ubuntu 18.04 LTS Digital Ocean droplet with 1GB RAM. I have decided to deploy Django app on Digital Ocean with Postgres and Redis so we can make sure that site will continue working after Ubuntu upgrade.

Selected the key from Appliku Team. For this purpose we are using the New Custom Server option, because Appliku through Digital Ocean API creates 20.04 LTS and that's not what we need for this demonstration.

Copy IP address of the server

Paste into Appliku's New Custom Server form and click "Check credentials and add server"

When server is added and fully set up login via SSH. If you haven't added your public key to your account you can do it here: SSH-Keys
Let's also create an app and 2 databases: Postgres and Redis.
By the way you can read more about deploying Django apps:
- Deploy Django on Hetzner Cloud
- Deploy Django to Digital Ocean Droplet
- Deploy Django to AWS Lightsail
- Deploy Django to AWS EC2
- Deploy Django on Linode
- Deploy Django to Google Cloud Platform
Make sure your app works and let's get to the Ubuntu upgrade from 18.04 LTS to 20.04 LTS.
Upgrade Ubuntu 18.04 LTS to 20.04 LTS via SSH
Let's ssh to the server as root
ssh root@server-ip
 Let's see what happens if we follow recommendation on the screen to do
 do-release-upgrade:
Didn't work.

What you need to run is apt dist-upgrade -y:


Now that dist-upgrade is done you need to reboot the server.
Type command reboot, it will close ssh session and going to reboot. Wait for few seconds and start trying to reconnect.


It is done, now we can run the
RELEASE_UPGRADER_ALLOW_THIRD_PARTY=1 do-release-upgrade
Some cloud providers have their own local repository for optimization, and remove the canonical repository. If do-release-update disables the "3rd party", its actually cutting off the core source.
That's why we allow third party sources with RELEASE_UPGRADER_ALLOW_THIRD_PARTY=1
You will be asked about spinning up additional SSH instance, let's say yes by pressing 'y'.

To make recovery in case of failure easier, an additional sshd will
be started on port '1022'. If anything goes wrong with the running
ssh you can still connect to the additional one.
If you run a firewall, you may need to temporarily open this port. As
this is potentially dangerous it's not done automatically. You can
open the port with e.g.:
'iptables -I INPUT -p tcp --dport 1022 -j ACCEPT'

To continue please press [ENTER]
If you have firewall setup, you can follow these instructions. If you are using cloud provider firewall, you might need to enable 1022 port in the cloud provider's dashboard.

Hit Enter.
Strangely enough, it still talks about disabling 3rd party sources, let's hit enter.

Luckily, everything goes well and it asks to confirm downloading the upgrade package(s) and starting the upgrade process. Press 'y'

There are services installed on your system which need to be restarted when certain libraries, such as libpam, libc, and libssl, are upgraded. Since
these restarts may cause interruptions of service for the system, you will normally be prompted on each upgrade for the list of services you wish to
restart.  You can choose this option to avoid being prompted; instead, all necessary restarts will be done for you automatically so you can avoid being
asked questions on each library upgrade.

Restart services during package upgrades without asking?

Select Yes and hit Enter.
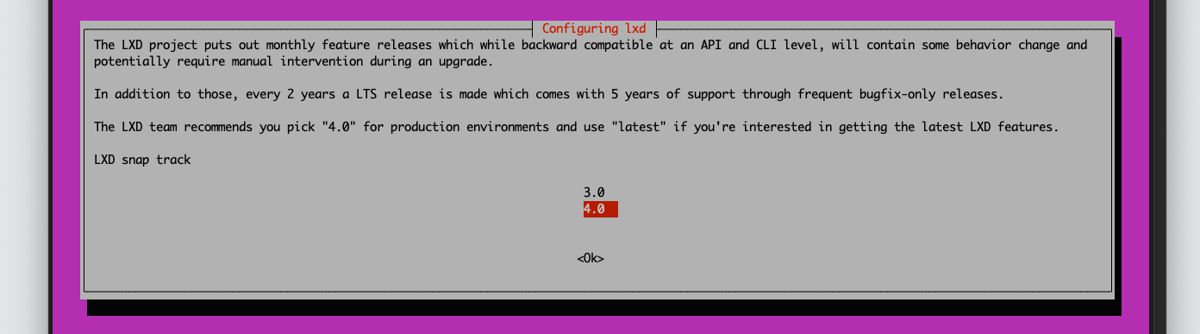
Then you might be presented with the question about Configuring lxd:
The LXD project puts out monthly feature releases which while backward compatible at an API and CLI level, will contain some behavior change and
 potentially require manual intervention during an upgrade.

In addition to those, every 2 years a LTS release is made which comes with 5 years of support through frequent bugfix-only releases.

The LXD team recommends you pick "4.0" for production environments and use "latest" if you're interested in getting the latest LXD features.
Pick 4 upon their recommendation.
You will be asked about the default nginx site. Choose 'N'
Configuration file '/etc/nginx/sites-available/default'
 ==> Modified (by you or by a script) since installation.
 ==> Package distributor has shipped an updated version.
   What would you like to do about it ?  Your options are:
    Y or I  : install the package maintainer's version
    N or O  : keep your currently-installed version
      D     : show the differences between the versions
      Z     : start a shell to examine the situation
 The default action is to keep your current version.
*** default (Y/I/N/O/D/Z) [default=N] ?

You will be asked about SSH configuration
A new version (/tmp/fileLKoMTg) of configuration file /etc/ssh/sshd_config is available, but the version installed currently has been locally modified.
Select install the package maintainer's version.

Finally, you will be asked about what to do with obsolete packages. Remove them.

System upgrade is complete.

Restart required

To finish the upgrade, a restart is required.
If you select 'y' the system will be restarted.

Continue [yN]
Type 'y'

SSH connection will be terminated, wait a bit and reconnect. You will see that the Ubuntu has been successfully upgraded from 18.04 LTS to 20.04 LTS

Now the main part: Let's check that our site is working.
And it does!
